DIY Off-Grid Solar System with Lithium Batteries
Dreaming of living independently from the grid or powering your RV, cabin, or remote property with clean energy? A DIY off-grid solar system gives you the freedom to generate and store electricity anywhere the sun shines, and you’re in full control of your own power.
In this guide, we’ll learn the steps of building a DIY off-grid solar setup, and show the essential components you need, including lithium solar batteries and solar power kits to make the process easier and more reliable.
Table of Content
What is An Off-Grid Solar Power System?
An off-grid solar power system is a standalone energy solution that operates completely independent of the utility grid. It can store energy from solar into batteries for use whenever in day or night, sunshine or rain.
By DIY off-grid solar system, you can get:
- Energy Independence: No need to rely on the power grid or worry about blackouts.
- Cost Savings: Building it yourself cuts installation costs, and solar energy reduces monthly bills.
- Sustainability: Harnessing renewable solar power lowers your carbon footprint.
- Flexibility: Tailor your system for cabins, RVs, boats, or even a small homestead.
Key Components of a DIY Off-Grid Solar System
Having the following components properly sized and integrated is the foundation of a successful off-grid solar system:
- Solar Panels: Capture sunlight and generate DC electricity.
- Solar Charge Controller: Regulates the power going into the batteries and prevents overcharging.
- Battery Bank: Stores and provide energy for use when the sun isn’t shining. Lithium batteries are the preferred choice.
- Inverter: Converts DC electricity from the batteries into AC power for appliances.
- Wiring, Breakers, and Mounting Hardware: These solar accessories ensure safe connections and installation.

Step-by-Step Guide: Building Your Off Grid Solar Setup
Step 1: Calculate Your Power Needs
The first step is to figure out how much electricity you’ll use on a daily basis. This ensures that your solar panels and batteries are sized correctly.
- List the appliances and devices you’ll run (lights, fridge, laptop, etc.).
- Check their wattage on the specification chart and your daily usage hours.
- Multiply to get watt-hours (Wh) and total daily energy demand.
Example: A 60W fan running 5 hours daily = 300Wh. Add everything up to size your system correctly.
Step 2: Choose and Size Your Solar Panels
Once you know your energy needs, you can calculate how many solar panels are required. The number of panels depends on your total energy consumption and how many hours of direct sunlight your location receives daily. You can calculate by the formula:
Daily energy demand ÷ average sunlight hours = required solar wattage
Example: 3,000Wh ÷ 5 hours sunlight = 600W solar panel array.
For solar panel types, choose monocrystalline panels for high efficiency, as they typically deliver better performance in limited space and under low-light conditions compared to polycrystalline panels. If budget is your top priority and you have plenty of installation area, polycrystalline panels can still be a cost-effective choice.
Step 3: Choose the Right Battery Bank
Your batteries store the solar power for use at night or on cloudy days. Lithium deep cycle batteries are highly recommended for a solar setup because they’re more lightweight, efficient, and long-lasting compared to lead-acid.
Most importantly, lithium batteries can handle higher current loads and a greater depth of discharge, which means they can power more demanding devices for longer periods.
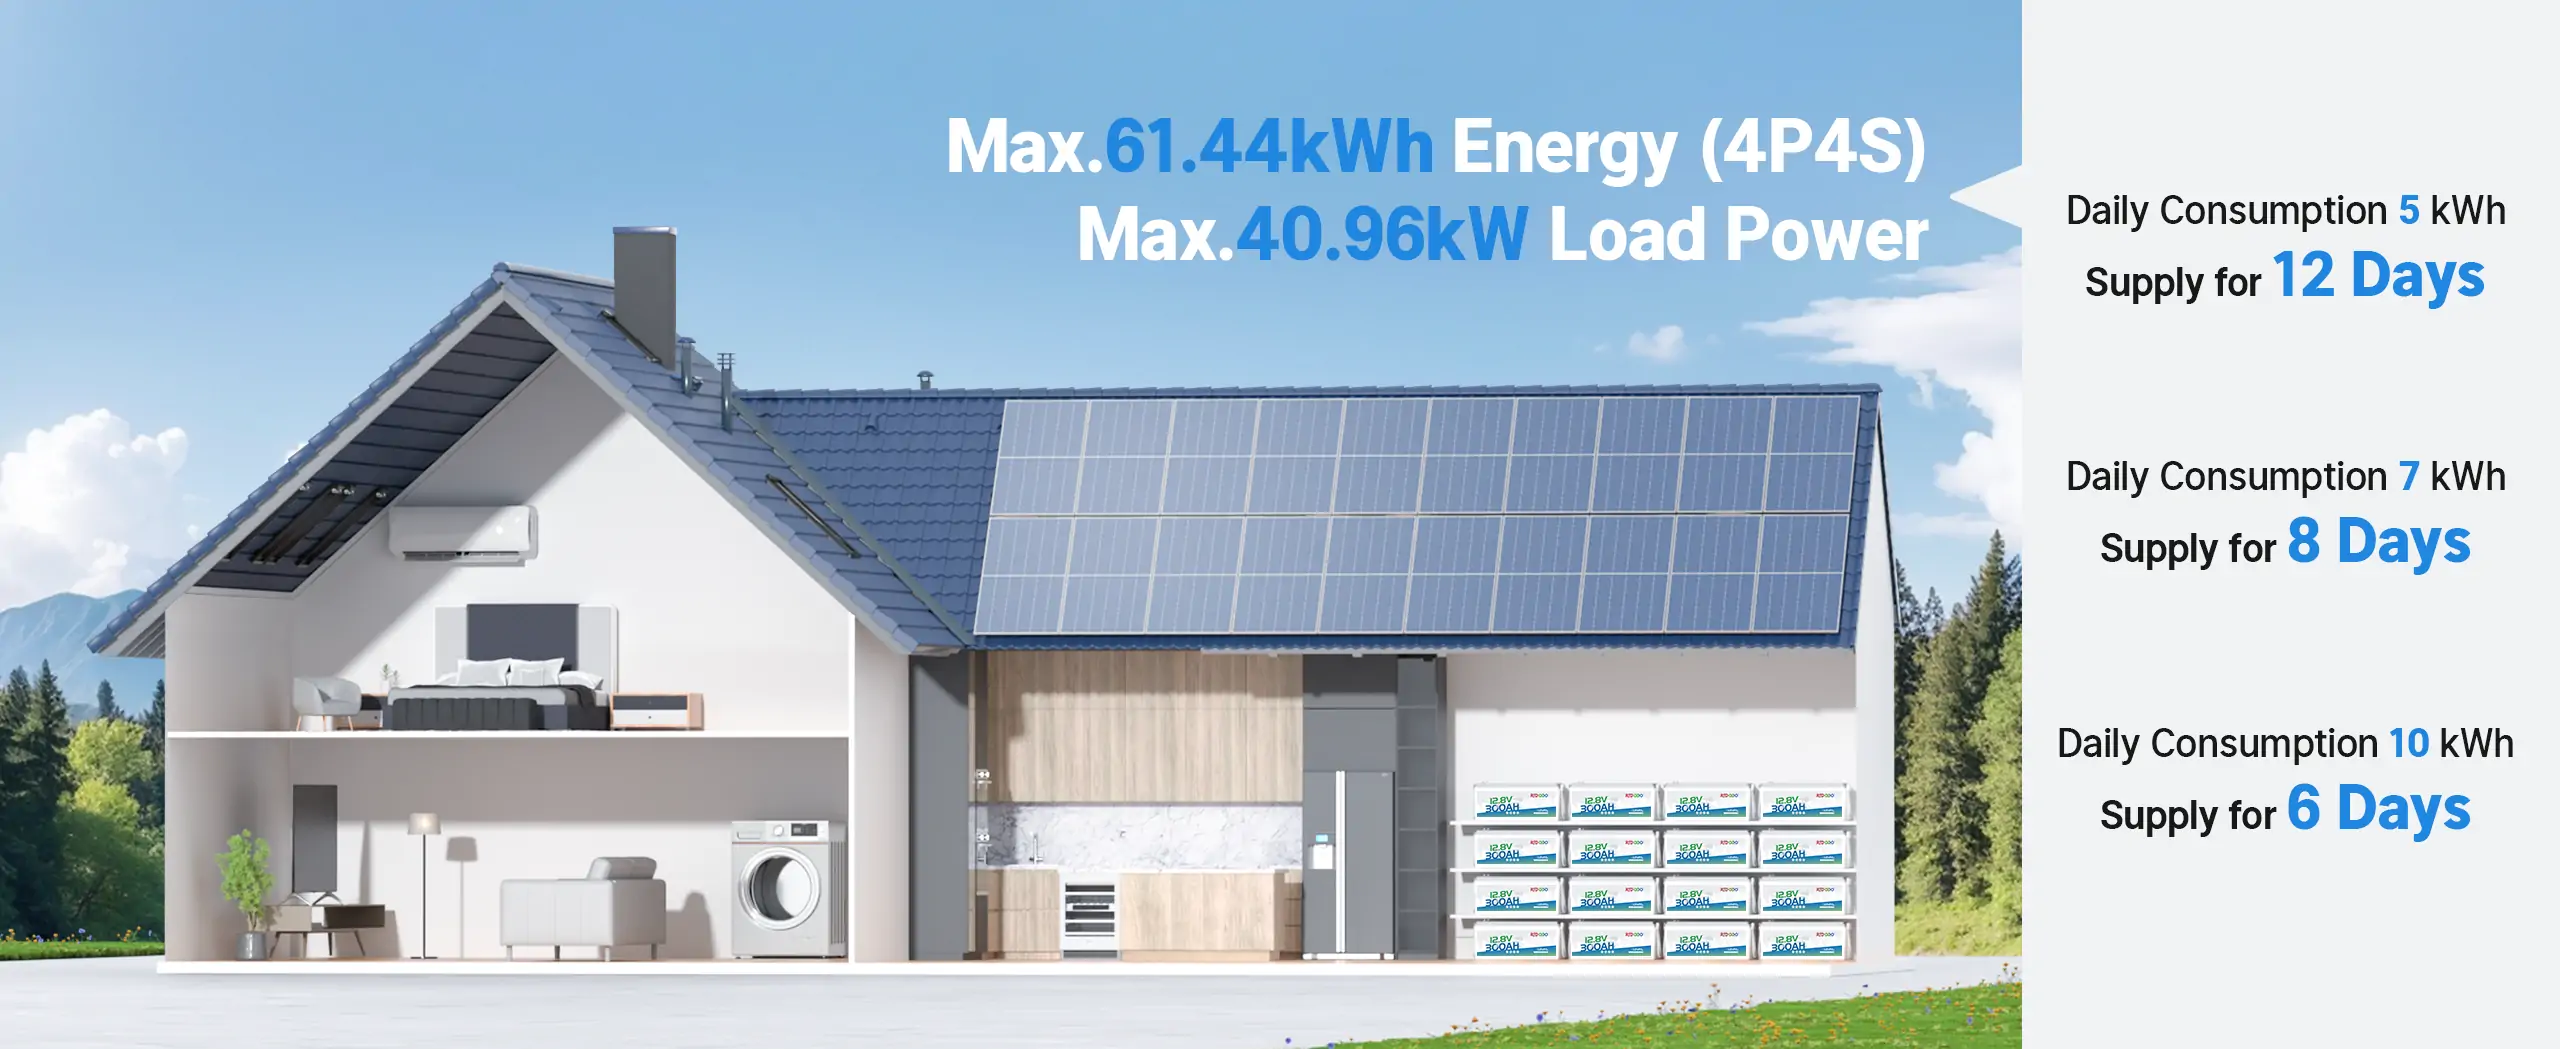
But what size of battery do you need to power a home? First, decide how many days of backup storage you want for your off-grid solar system. For most homes, cabins, or RVs, 1–3 days of autonomy is common, giving you enough energy to handle cloudy weather or unexpected outages without running out of power.
Next, calculate the size of your battery bank. Use the formula simply:
Daily energy demand ÷ battery voltage ÷ depth of discharge = required amp-hours (Ah)
Example: For 3kWh/day with 12V lithium battery at 90% usable capacity, you’d need a 300Ah.
The Redodo 12V 300Ah lithium battery is an ideal solar lithium battery for home use. It provides a high 3.84kWh of energy, which is easy to meet a daily energy demand of 3kWh. For higher energy demands or longer backup storage periods, you can connect multiple batteries in series and parallel to expand the capacity of the battery pack.
Step 4: Choose a Solar Charge Controller and Inverter
Solar energy flows from panels into batteries, but it must be regulated. That’s where the solar charge controller comes in. Then, since most appliances need AC power, the inverter converts DC from the batteries into usable AC.
To maximize the solar energy from your solar panels, choose a MPPT (Maximum Power Point Tracking) controller and a pure sine wave inverter. If your appliances draw up to 2500W, you’ll need a 3000W inverter.
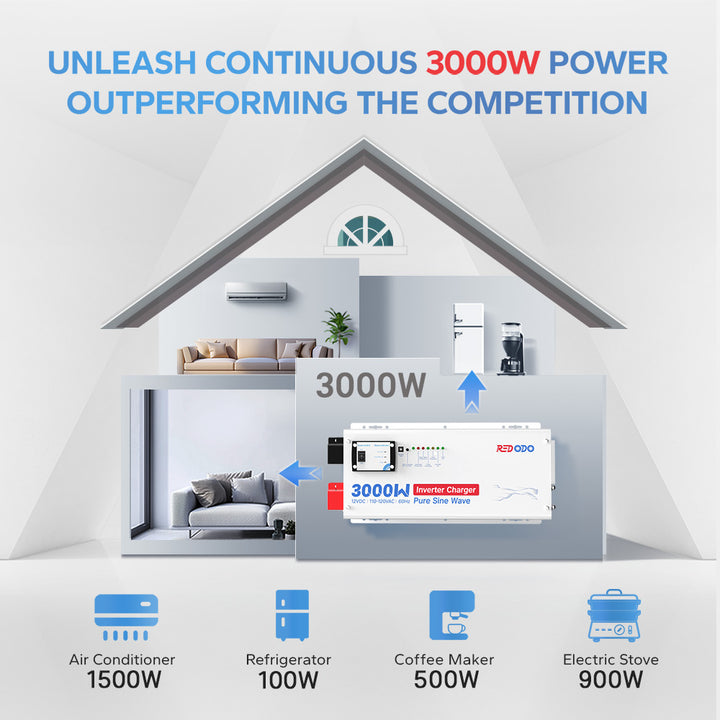
Redodo 3000W Pure Sine Wave Inverter
It’s important to match the voltage across your system. The solar panels, charge controller, and batteries should all operate at the same voltage—commonly 12V, 24V, or 48V. This ensures compatibility, maximizes efficiency, and prevents potential damage to your equipment.
Step 5: Install the Solar Panels
Before connecting the components, determine the installation position of your solar panels. Roof-mounted panels are ideal for homes, RVs, or tiny houses. They save ground space and often make wiring easier since the system is closer to the main electrical setup. However, the roof must be sturdy, angled properly, and free from shade.
Ground-mounted panels are better for cabins, farms, or areas with lots of land. They allow you to adjust the tilt angle throughout the year for maximum efficiency and make cleaning or maintenance easier. Ground mounts also avoid roof penetration issues but require more upfront structure and space.
Step 6: Wire the Solar System
With all components selected, it’s time to connect your DIY solar system! Proper wiring and safety components (breakers, fuses, disconnects) are essential for a safe and reliable installation.
The right wiring order is:
- Connect the battery pack to the MPPT charge controller
- Connect the battery pack to the inverter
- Connect the inverter to your loads
- Connect the solar panels to the MPPT charge controller

Off-grid Solar Power System Wired Diagram
Use appropriately sized wires to prevent voltage drop, overheating, and even safety hazards. Thicker wires can handle higher current than thinner wires.
You should also include fuses and breakers in your system design. These protective devices guard against overloads, short circuits, and potential fire risks. Placing fuses and breakers between major components like solar panels, charge controllers, batteries, and inverters ensures that any fault is quickly isolated, keeping your equipment and your home safe.
Step 7: Test and Maintain the Solar System
After wiring, test the system to confirm everything is functioning. Check that the panels are charging the batteries, the inverter is delivering clean AC power, and your loads are running smoothly.
If necessary, install a battery monitor with shunt for monitoring your system. Many modern lithium batteries with Bluetooth can also check voltage, cycles, and capacity in real time.
To keep your DIY off-grid solar system running efficiently and safely, clean your solar panels regularly to remove dust, dirt, or debris that can block sunlight and reduce efficiency. Inspect your wiring and connections periodically to make sure there are no loose, corroded, or damaged cables.
All-in-One Solution: Redodo DIY Off Grid Solar Power Kit
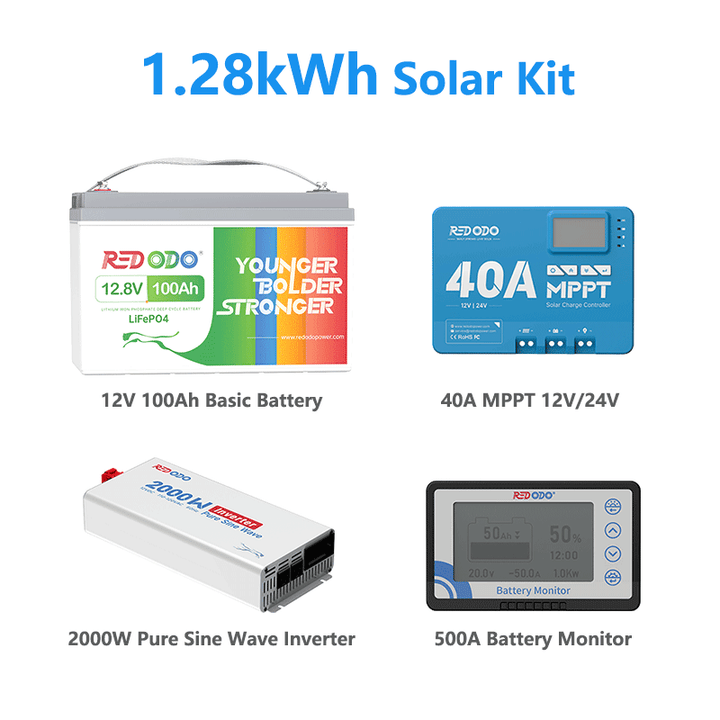
If you’re new to solar or simply want a straightforward way to get started, the Redodo 1.28kWh Off-Grid Solar Power Kit is the perfect solution. Designed as a one-stop package, it includes essential components you need for a basic solar setup:
- Redodo 12V 100Ah lithium battery
- 12V/24V MPPT charge controller
- 1000W/2000W pure sine wave inverter
- 500A battery monitor with shunt
Say goodbye to the hassle of complicated selections and the risk of mismatched components, the kit saves you both time and effort during installation. In just a few steps and purchased solar panels, you can effortlessly set up your own personal microgrid, ready to power your home, RV, cabin, or off-grid retreat.
Need higher voltage configuration? Explore Redodo 24V lithium batteries and 48V lithium battery for solar.
Conclusion
Building a DIY off-grid solar system with lithium batteries is an empowering project for those seeking independence, sustainability, and control. By following this guide the steps of building off-grid solar setup, you’ll gain clean, reliable energy tailored to your needs.
Read Redodo’s User Stories about DIY Solar System:

Redodo
Redodo
Join Redodo
Related Post

5 Best 48V Lithium Batteries for Golf Cart in 2026

What Battery to Run a Fish Finder and Livewell All Day?

A Full Guide of Wiring Solar Panels in Series vs Parallel

How to Install Solar Panels on an RV or Motorhome? Step-by-Step Guide

Best Prime Day LiFePO4 Battery Deals on RV, Boat, Solar & Golf Power
Related Products


Redodo 12V 300Ah Lithium LiFePO4 Battery | Replaces 6*12V 100Ah AGM Batteries | For RV, Marine, Home battery backup

🔥【Extended Deal】Redodo 24V 100Ah LiFePO4 Lithium Battery | Marine, RV, Solar Home, Home Backup